Showing posts with label photography. Show all posts

Thursday, April 14, 2011

As a photographer, myself, I always appreciate the work of other photographers. Here is one that you have to meet.


Here is our interview with the photographer, Jessica -

Briefly describe your photography?

I am most drawn to extremes with light and color. I want to tell a story with my photography. I am always trying to capture a moment in my life that I want to remember, not just for the image that is taken but for where my life was at that time, what i was experiencing, how I was developing, and in which direction my life was headed.

What do you enjoy photographing the most?
I really like photograph architecture. I would say that I am most drawn to that because I like the lines. I am also very interested in Urban life right now. City scenes, spray paint...stuff like that.

How long have you been an artist?

Since I can remember. I always knew I was an artist. I really wanted to be a painter or a sketcher when I was little because that is what my grandma and dad are good at, but I am terrible. It wasn't until later that I discovered my eye for photography.

How did you get started?

The first time I ever thought about selling my photography was about 4 years ago while I was living in France. My husband and I were taking a day trip. We were in the car, driving through the french country side, right before a storm. The sky was this amazing mix of purple, grey, black and yellow and the silhouettes of the trees against the sky were beautiful. I really wanted to get a picture of it but my camera was dead. I somehow managed to get my camera to turn on for long enough to snap one picture. For some reason that picture is what made me want to share my work with other. It's funny because I don't think that is even the best photo I've ever taken just the most inspirational. (You can find that picture on my Etsy shop, titled "A Tree in the Storm")

Where does the name of your shop come from?

I lived in Paris for a couple of years. Le Metro Ligne 6 was the closest line to our apartment there. I have so many fond memories of my life there that I thought it would be appropriate to incorporate my shop name into that experience.

What would you most want people to know about your work?

That I really love what I do!

What words of advice do you have for other artists?

Love what you do!

---------------------

You have to come and see this nice work. Visit this shop and then come back and leave a comment.

Thursday, February 3, 2011

Craft Selling Venues Online

Most of the readers who come to this site know about Etsy and many have their own Etsy shops. There are changes going on at the Etsy site that may greatly have an effect on the sales potential at that site. Many are scrambling to expand to other selling venues online.

One of the problems is that many sites charge not only a setup fee but also a monthly fee to keep a shop on that site. I have looked at many sites, tried a few who either charge no fee or just a listing fee and I have not had the success that I have had making sales as I have had on Etsy. Will that success continue there remains to be seen.

A few months ago I wrote about trying a shop on a site called Zibbet. So far that shop has made no sales - and it went through the holiday season as well.

A site that many talk about is Artfire. Artfire requires payment for the site but offers a small free shop site as well. My shop at Artfire - though it only has one item listed - my best seller - has had no sales.

A site that has had sales for me is called Silkfair. I have made several sales on the Silkfair site but these have been over the course of more than two years. Silkfair is a sales site that is not just limited to art and craft. General merchandise is sold on the site as well. The owner of the site had tried hard to make it visible and bring customers to the site. There is also a way to migrate your Etsy listings to your Silkfair shop.

I have shops on two sites that are strictly art and I have photography on both and my ACEO mats on one in addition to the photography. One of those sites is Redbubble. Redbubble is a site that prints your artwork, in my case my photography, and ships it to the customer for you. All you do is upload artwork. You set the percentage of the selling price that you will get and Redbubble sets the price. You can sell prints, cards, shirts, calendars, and framed art. All of the work in production is done by Redbubble. The site is based in Australia so the shipping prices to the US are high. I have made sales on Redbubble BUT I have yet to be paid. WHY? Redbubble pays you when your sales balance reaches $50. It has been a couple of years and I have yet to reach that.

The other art site is Art by Us. Here there are no fees AT ALL. You list your artwork or art supplies and you can either set a flat price or run an ebay like auction. Listings remain for months and are easily renewable - and they are free. The site is set up with an emphasis on individual listings and not on "shops", though it is possible to create a single link to all of your listings.

So now we wait and see. Will the changes that have been announced and started to be enacted on Etsy cut down on sales? I certainly hope not but without the ability to interact on the site with potential customers, I think that there will be a downturn coming.

Thursday, January 27, 2011

Scan Instead of Photograph

I recently posted some new items in my Etsy shop and when I photographed the items the images were just coming out with colors to match actual items. I used my good camera - the one that never fails - and put the images through Photoshop to correct the color as best that I could - and still the colors were not correct. There were color casts and tones that just would not go away no matter what I tried.

I was about to give up when I thought of my scanner. Now, my new items are flat and could easily go onto the scanner bed, but I have done this in the past with fully three-dimensional items and it has worked well.

First chose a good background - a piece of color (or white) paper or cardstock. Place the object on the glass bed of the scanner. Cover the object with the background. Close the scanner cover gently on top of the item. Most scanners are made to scan open books so there will be some flex in the cover hinges to get the cover closed flat. If you find that the cover sticks up too far and too much light gets to the bed, cover the top of the scanner with a dark cloth to block the light (this is rarely necessary). Go to your computer and scan. You will get a perfect image that you can place into your software and resize, crop, or manipulate as you choose.

This won't work for everything but it works for many items - especially if they are small and relatively flat.

Recently, new technology is being introduced to scanners that work with digital camera technology rather than a light bar that scans as a photocopier does. These new scanners are actually shooting high megapixel photographs of whatever is on the bed of the scanner. One that I heard about from Lexmark is selling for about $400. I am sure more will come along and the prices will drop considerably.

Monday, November 1, 2010

New Site

Come take a look at a new photo blog site that I have created to feature my photography. The images will be added twice a week on Tuesdays and Fridays. Most images will be available for sale at one of the sites that I am on. Come and see PAST PERFECT.

Thursday, July 29, 2010

New Camera

I recently moved up to my first digital SLR camera - Canon's newest model - T2i. Getting this camera was not easy. It was released this March and almost immediately sold out everywhere. It took until just recently for me to get a hold of one of my own. I did a lot of research and looked and tried a number of cameras until I decided that this is the one. One major factor was price range. You can purchase a DSLR anywhere from $500 to $4000. My budget was $1000 and I wanted to get the most for the money at the best quality. For those who are not heavily into photography, a DSLR is a digital camera with interchangeable lenses and what you see in the viewfinder is not an electronic representation of what the camera sees but the actual view through the lens brought to the viewfinder with a mirror. Essentially, what you see is what you get - with the ability to make any adjustment possible in exposure, lighting, tone, depth of field, etc. Way back before digital cameras I did shoot a film SLR - which I still have - but let's face it with the ability to shoot digitally whatever you see at no cost in film or developing - well.

I have been shooting professionally with a Canon that is in-between a DSLR and a Point in Shoot and all of the photos that I have sold up to now have been with that camera. I have even won photo competitions with that camera and have gallery displayed my work. But it was time to make the move and now with 18 megapixels and a high tech camera I am hoping to expand both my market and my ability to capture what I see.

Here is a photo from my first excursion out to take pictures.


The photo was actually the worst of the pictures that I took that day and I decided to improve what little I had with photo software. Why did I pick the worst shot to show you? To show what is possible both with the camera and the ability to manipulate a photograph after it is taken. I must say that in the end it came out pretty good - and is offered for sale both at a Stock Photography site and at my page on Red Bubble.

This picture was taken with a 18 to 55 mm zoom lens - the standard lens included with the camera when you purchase what the camera companies call the "kit" meaning that it includes the camera body and a lens from the manufacturer. This is the "kit" lens. I also purchased a longer zoom lens - 55 to 250 mm. This lens I am finding is more versatile when outdoors as it can bring the distance in close and still has a decent wide angle view.

What I am finding out most is that I have a lot to learn about this camera, but so far the results have been very pleasing. As time goes along I will be showing more photos on my various sales sites from this new, great camera.

If you are thinking about getting more seriously into photography this is a camera to definitely check out - Canon T2i.

Thursday, December 31, 2009

Combining Shops

For those of you who shop or sell at Etsy - the number one site to buy handmade craft and art - you may know that some sellers run more than one shop with the idea that different types of items should be sold in apart from each other. A few years ago, I opened a second shop for my photography, pastperfect. I did this for two reasons - the first and foremost, was that I was interested in becoming a member of the Etsy photography "street" team called POE - Photographers of Etsy. When I had contacted them from my shop, qbranchltd I was told that only shops that sold only photography were admitted as members. The second reason to open the second shop for photography was the idea that I could direct galleries and other interested parties to that shop to see my photography - without any distraction of the other things that I sell.

What I have found since opening this second shop is that it is very difficult to promote two shops equally and the attention and effort that is devoted to one takes a great deal away from the other. Yes, the second shop made some sales, but nothing like my first shop makes. I almost said my "main" shop. This is what happens. It is very hard to treat two shops as equal children - giving them both the love and attention that they each deserve and must have to flourish.

I have been seriously thinking of taking all of my photography - as it expires (and a great deal of it has already expired) and move it to my first shop. There it will get the attention of my efforts that I put to promote that shop. There it may get noticed by those who come to browse - to those whose initial attention is attracted by other things.

If I do this, it will happen a week or two into the new year - which by the way arrives in about six hours. With the Christmas retail season past and the late winter and Spring holidays on their way, perhaps - just perhaps - things will change for the better in sales of my art photos, nestled snugly in their own little category at qbranchltd. Come around in a few weeks and see.

If you are thinking about opening a second shop, think long and hard about how you will promote it and the time and resources that you have to do that. Whatever you do now will then be split in two. It is something to consider.

And crazy me! I have something new and different for me that I am thinking of making and selling and I had the thought that it might do better in --- it's own shop.

Happy 2010 to all!

Thursday, December 10, 2009

Something a Bit Different

I thought that with all of the promotion and presentation of other artists that I do on this site I might blow my own horn and share some of my work with you. I am an eclectic craft artist. I work in a variety of mediums. I have been creating craft for more than forty years and I have always look at new ways to express myself. What will happen is that I will see something that catches my eye - a medium that I have not tried yet and then start finding out all that I can about it. Almost all of my skills have been self-taught. I am a strong believer that if you are motivated and willing to put in the time to find out how something is done you can do it.

As I am blowing my own horn here I will say that what I have set my mind to mastering I have been successful at. I have had many exhibitions of my work. I sell in a gallery. I have won awards, both local and statewide. I have been published in craft and art magazines. And I have three pieces in a museum collection. All this in addition to selling for the past over thirty years at craft shows - and now on the Internet at Etsy and my own sites.

I present to you a sampling of my work. With it you will find links where you may purchase if you so desire - and if that link does not work, it means, happily, that the piece has been sold.

I have been turning pens for about six years. I work on a wood lathe and create the barrels for the pens and assemble the wood barrels onto high quality pen hardware.

This particular pen is of artistic styling - not a conventionally shaped pen. This pen is made of Goncalo Alves and interesting wood that is light reddish brown in color.


This pen sells at my shop at Etsy. If you are interested take a look HERE.


Here is something from my other passion - living history. I am a reenactor of the American Revolutionary War period.
I created this game to play at 18th Century encampments and thought it would make a great addition to my crafts for sale. I has proven very successful and is sold through a national catelog/website for living history. I also sell it at my shop at Etsy. In my shop this is called The Pirate's Box Game. It is a gambling actually played in the 18th Century. It was very popular at seaports and with pirates, along with those with a bit of coin to lose in taverns.

This is a fun game that may be played by all ages. The game may be played solitaire or with a group. If you are interested in this game - they make great gifts - come and take a look HERE. These are always in my shop so if this link does not work just go to my Etsy shop - Q Branch Ltd. to see one.


This is called a Lucet. This is another of my historic reproduction. This is an ancient cord making tool used for thousands of years to create strong, decorative cord. If you look at Cinderella's dress and see the lacing holding it up in the front - that is cord made on a lucet. Lucets were used commonly throughout the 17th Century through the 19th Century in America. They are still commonly used in parts of Europe today.

The lucet is fun to use and VERY EASY to learn. The cord made on the lucet today is made from any string, thread, floss, ribbon, yarn, and so on. The cord that is created is thicker and stronger than the string that it is made from. Today it is used by craft artists for jewelry, fabric embellishment, laces, and so much more. This is simple enough for a child to learn and create friendship bracelets, shoe laces, and such. These are always in my Etsy shop made from different woods and there are two styles - with a handle and without. This has no handle. The difference is just a matter of preference - as they make the same cord. If you are interested in a lucet look HERE. Also if this link is sold there will always be others in my Etsy Shop.

I am not going to overwhelm you all with too much but I should mention my other shop - Past Perfect and show you a sample of my work from that shop. This is my photography shop and I have been professionally taking art photographs for the past four years. Here is just one of my photos. This is a red tail hawk. This hawk was rescued by a wildlife rescue preserve. I was doing an indoor craft show and this preserve was showing some of their animals to the public. It happened that our booth was right next to their presentation area and I was so close that I could take photos that I never would have been able to get any other way. I am glad I had my camera with me that day.

If you are interested in this photo it is HERE. There are many other photos - and another hawk too - at my shop Past Perfect.

So there you have it. A small sample of my work. I thank you all for looking and appreciate any comments.

Thursday, November 26, 2009

FEATURED PHOTOGRAPHER

First, Happy Thanksgiving to all!

We have another great photographer to feature. Come and meet


Here is our interview with the photographer...

Briefly describe what you make?

I make fine art photographs. Mostly I focus on nature photography, but I also have some whimsical and some industrial subjects.

What mediums do you enjoy working in most?

I am adoring digital photography because I take A LOT of pictures! Digital allows me to try angles and styles that I might not have with film because of the expense.

How long have you been creating craft?

I've always been interested in photography. My grandparents gave me my first "real" camera when I was about 8.

How did you get started?

When my grandfather passed away a few years ago, my grandma gave me his circa 1970 Olympus and all the lenses and things he had acquired over 30 years. Since then I've switched to digital, but I haven't stopped shooting!

Where does the name of your shop come from?

The name of my shop comes from my desire to show things the way they actually appear. Nature photography is my main focus- hence, the "stone." Presenting nature unaltered, unPhotoshopped, unposed is where the "unturned" part comes from. I don't turn the stones I photograph!

What would you most want people to know about your work?

I show people what I saw. I rarely alter photographs beyond cropping, and perhaps changing to black and white. I really only use Photoshop to put on my watermark! I like people to know that what they are seeing is real, not the result of tweaking in a computer program. I think that's important to show people real nature before it disappears.

What words of advice do you have for other artists?

Doing something you love is so important. It's such a thrill to open my new images and find something that makes me proud. I wish that feeling on everyone.

______________________

You know the expression that a picture is worth a thousand words - check out this shop!

Thursday, October 29, 2009

FEATURED PHOTOGRAPHER

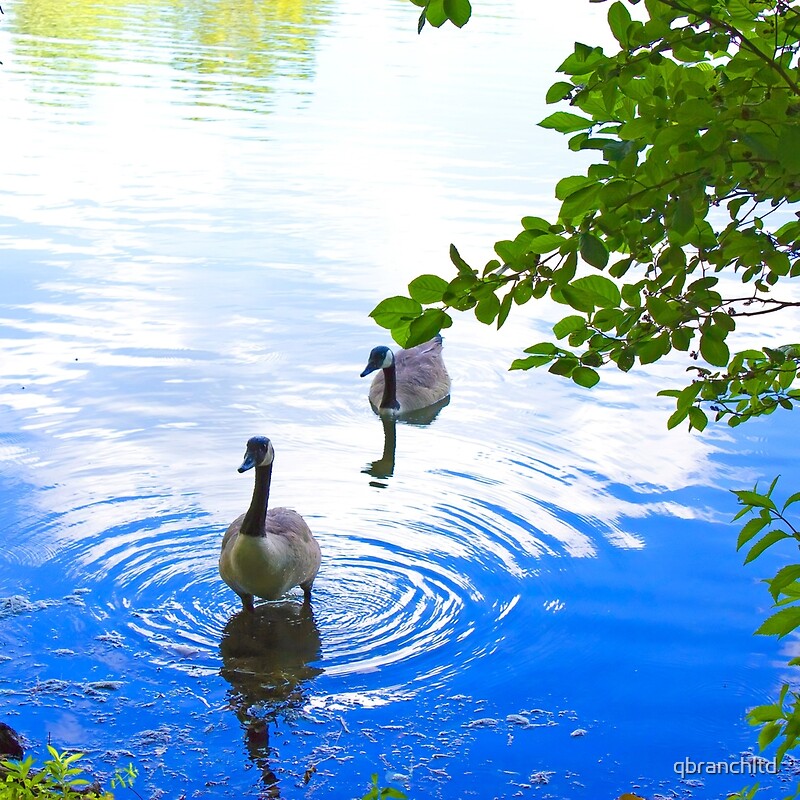
Here is a photographer on Etsy with some great Fall themed photographs - and more. Come and meet


Here is our interview with the photographer, Ezzy!

What do you make?

The short answer to that is Artwork! I shoot with a Nikon D40X - digital - then use photoshop to enhance, change, and edit my work. My subject matter mostly includes landscapes, but I also take a few still lifes. I do some portraiture outside of my etsy shop.

What mediums do you enjoy working in the most?

Well, photography in all aspects of course, but there are, after all, many different aspects of photography. I was never much good at taking pictures when I was young. I can't tell you how many photos I have of people from the neck down that I took with my first camera. But eventually I started working with film - and I fell in love with it! Nothing makes a better sound than the swish and click of the shutter on a completely mechanical old camera. And then there is the darkroom . . . the acid smell of the developing chemicals and the weird light. But digital has been a fun experience as well. The convenience, ese adn versatility of digital is a great addition to the world of photography. And then there is photoshop. It took me a lot longer to warm up to that than anything else, but now that I have learned it, it is so much fun to create in it!

How long have you been crafting?

Well, as an artist, I have been drawing as long as I can remember. I ghad an old Sunday school teacher who used to tell me she knew I'd become an artist because when I was two and in her sunday school class, she gave all the children crayons and paper. And while all the other children were eating the crayons and throwing them at each other, I was sitting quietly, drawing little circles on my paper. I started painting with oils when I was 11 and continued that through college. It wasn't until my sophmore year of college that I discovered photography, but I fell in love with it. I'm 26 now so I have been photographing for about 7 years now.

How did you get started?

I was reluctant to do it, but I signed up for the photo class offered at my college. I borrowed an old Canon camera from a family friend, never intending to like photography enough to want to buy one of my own. I was just taking the class because I needed the credit for my art degree. I wasn't very good it at first - I actually had to reshoot my first assignment and stay after class for some one on one tutoring with my teacher. But when I finally got the hang of it, I excelled. I stayed late after class and came in to the darkroom in the evenings afer work. Eventually I grew to love it enough and gather enough skills, I presented my senior art show in photography. I now own 2 35mm fil cameras, a yashika medium format camera, a holga, and a Nikon D40X.

How did you name your shop?

The name of my shop comes from my name. In case you are curious (cause it's kind of a strange name) there is a story behind "ezzy." I have a younger brother who I am very close to. He is two years younger than I am and when we were little, he couldn't say my name - Sara. So, he called me "Sever" and I hated it! That's how little brothers are! And of course, since I hated it, he did it even more. As we got older "Sever" went way until I was in middle school and he started calling me that again. Then, one day out of the blue, he started calling me Sever again. A couple weeks later, he mixed it all around and called me Ezzfur. I was mortified and made him promise to never call me that in front of anyone ever. So what does he do? He calls me that at a birthday party in front of friends. They liked it, latched onto it and shortened it to Ezzy. And it stuck! So when I first discovered etsy, I created an account under my name. I have named my shop "In Other Words, Photography." My husband is a writer on the side and he actually helped me come up with it. It goes along with the old cliche that a picture is worth a thousand words.

What would you want people to know about your work?

I guess what I want people to know about my photography is that I never really feel more like myself than when I am behind the lens. It's a natural high - I find myself smiling every time I lower the camera after taking a picture. Beauty is all around in the big and in the small. When I am behind the lens, I get to explore that beauty, single it out, give it a voice. My portrait work, for example, is very rarely posed. My best photos are when people aren't paying attention to me - when they are relaxed and natural. I don't create wuth the sole purpose of making money - I create for the joy of it. For the sound of the shutter opening and closing, for the excitement of downloading a shoot and seeing what came out, for the smell of photo chemicals and the feel of the camera in my hands . . .

Any words of advice for other artists?

To other artists, I would say be true to yourself. Create what you love and the work that comes from it will be a true reflection of yourself. Do it for the right reasons, for the love of the yarn sliding through your fingers, the feel of the clay spinning on the wheel in your hand, the paint beneath your finger nails, and dropped beads glittering in the carpet. Don't create to make a living - live to create. Know that what you leave in this world is a little more beauty a piece of yourself that can never be erased.

_________________________

Ezzy does some very nice work! You must go and see Ezzy's shop -and then come back here and your appreciation!

Thursday, October 8, 2009

FEATURED PHOTOGRAPHER

This feature brings you a photographer who sells her work on Etsy. Come and get to know


Here is our interview with the photographer, Gina -

Briefly describe what you make?

I shoot photography in black and white as well as color. My photos range from architecture to nature to anything that really catches my eye.

What mediums do you enjoy working in most?

My favorite thing lately has been black and white photos with a splash of color. I like to hand color a photo when I can. Other times I will use Photoshop to get that color to pop.

How long have you been creating craft?

The minute I developed my own film and made my own prints in high school, I was hooked. I loved that I could take something from start to finish by myself. So, that makes it about 12 years.

How did you get started?

I guess this question can be answered in the question before. That would be high school.

Where does the name of your shop come from?

I'm more of a visual person and less of a words person. So the name of my shop is just my name and what I do: Ginaphoto.

What would you most want people to know about your work?

I have a different perspective on things. I hear a lot of people say "I never would have thought to take that" or "You definitely have an eye for things". I love that. I love taking the ordinary everyday things and looking at them differently and putting that in a photo.

What words of advice do you have for other artists?

Words of advice would definitely be to keep trying and to get yourself out there. I kept thinking that people would just find me, which in some cases is true. But you really have to put yourself out there to get noticed.

_________________

What is not said in words, Gina says with her photos. Come and take a look at her shop and see her work. It is not the same old, same old.

Friday, July 17, 2009

FEATURED PHOTOGRAPHER

Here is another in our features of wonderful photographers who sell their work on-line. Come and meet -


Here is our interview with Andrea -

Briefly describe what you make?

I make photographs, mostly of everyday objects utilizing bold color and shapes, but I also have a few pretty flowers and landscapes available for sale.

What photo mediums do you enjoy working in most?

I always use a DSLR (digital single lens reflex) camera for my studio work and most everything else. However, lately I've been trying to use more film and to focus more on black & white. I'm trying to get back to why I fell in love with photography in the first place: just looking around and taking pictures of what I see instead of "creating" or "styling" a photo. When I do this, I use a Nikon N65 (my very first camera), a Holga, and a small accordion-style medium format camera called Wester Chrome-Six NKK.

How long have you been creating?

I having been taking pictures regularly since my freshman year of high school, about 8 years ago.

How did you get started?

I can't remember how I got started in photography. I've always been an artist of some kind, either painting or drawing and everyone always knew me as being very artistic. My guess would be that I've always liked looking at photographs and when I actually tried my hand at it, I liked it much more than drawing or painting. For me, it's much easier to make beautiful art with photography. If you mess up, you don't have to erase or start over, you can just take another picture. Which probably means I wasn't that good at drawing in the first place!

Where does the name of your shop come from?

The name of my shop IS my name!

What would you most want people to know about your work?

I would want most people to know that I put a lot of time and effort into my photography, especially the studio work. I know that my style is very different from the pretty, dreamy, flowery, neutral-toned work that seems to be most popular on Etsy, but I don't mind being different. Hopefully the people who like my work will find it and support it.

What words of advice do you have for other artists?

I'm so bad at giving advice... really all I can say is: if you love it, then do it. And don't let anyone tell you that you should do it a certain way or not do it a certain way. The best part about being an artist (as with everything else) is if you honestly stick to it, your art will grow and become stronger in time. Believe me, I feel I've come light years since I first picked up a camera!

_________________

Come now and take a look at Andrea's shop on Etsy. Andrea is a member of POE - Photographers of Etsy.

Thursday, July 9, 2009

FEATURED PHOTOGRAPHER

We present once again another of the great photographers to be found on ETSY who are selling their work. Let me introduce you to


Come meet Anne -

Briefly describe what you make?

Fine art prints

What mediums do you enjoy working in most?

Photography

How long have you been creating?

I got my first camera when I was ten.

How did you get started?

I always loved anything art related and having been drawing for years. I was an art major before I went into nursing. I became interested in photography specifically because it's the only color medium I feel really comfortable with. I love photography because it enables me to capture a moment the way I see it and to be able to share that with people.

Where does the name of your shop come from?

Too easy...my name ; )

What would you most want people to know about your work?

How much I really love capturing the intense beauty of Mother Nature and that I hope that they experience the same sense of peace and wonder I do when I am out shooting.

What words of advice do you have for other artists?

I'd pass on the best I was ever given and use often... Just keep going. Whatever you're working on, in whatever medium, may not look exactly as you'd like at the moment but just keep working because you never know where you'll end up. You may be surprised, sometimes it's the process that matter not the product.
________________

Please visit Anne's shop - AnneClarke. You will be delighted to find some wonderful nature photography including underwater scenes. In addition to prints Anne also offers her photos as pendants and greeting cards. Anne is a member of POE - Photographers of Etsy.

Wednesday, June 10, 2009

Choosing a Camera - Part 2

In my last article I started talking about what to know when choosing a camera. Now we are going to get a little more specific.

Let's start with Megapixels. Every digital camera will boast about how many megapixels the camera has. What does all of this mean? The larger the number of megapixels, the larger the image file size will be and the more detailed (supposedly) the image will be in the photograph. I say supposedly as there is some debate in the photography world that there are just so many megapixels the sensor in current camera technology can process and exceeding that makes no difference or can even have a negative impact. Never the less, the newest models are always more megapixels than last year's model. The newest models are at 15 plus mpx. But these are also the most expensive cameras. Expect to pay more for more megapixels no matter what category of camera you are looking at. Also keep in mind that high megapixel cameras can often be set to shoot photos at lower megapixel settings to save file space, but if you are going to never set your 10 mpx camera higher than 5 mpx, why pay that much more for your camera? I am not saying don't get as many mpx as you can afford - I would, but this is something to consider if you are on a budget and anticipate limited use of your camera for web photos (which need to be small anyway).

What brand camera is good? I am not going to say that any one brand is bad, but I will tell you that some brands are considered the top by serious photographers. At the top of the list are Canon and Nikon. These companies have been making film cameras for many, many years before they started making digital cameras and they bring their expertise and quality to all of the cameras that they make. Nikon has always had a reputation for one of the best lenses. Canon also has excelled in some of the features that they build into their cameras and thier lenses are also quality lenses. I have found the features in Canon digitals to surpass those in Nikon. Either one is going to take an excellent photo. Sony has been giving both companies competiton. Their expertise is electronics and they are concentrating that into their digital cameras. When I was looking for my last camera, Sony was my second choice, but Canon had more "camera" function in the model I was looking for.

I am going to jump off here to talk a bit about Canon. Many recommend the Canon Powershots - I agree with that recommendation but must add pick a model with IS in the name - IS for Image Stabilization. I spoke about this in this article. Canon has exceptional image stabilization in their IS models. This can eliminate the need for a tripod in many situtations. This can help anyone with "shaky" hands when trying to hold the camera still. Another create feature in many Canon's is "super macro", a macro mode beyond macro that will allow you to get so close to the subject that you have to be careful that you do not hit the lens with what you are taking a photo of. There may be other camera brands that do this, but from experience I can recommend Canon - as do many.

Is this going to just be a Canon ad? No. I have owned a number of cameras. Fuji has had nice features on thier cameras. Olympus has as well. But Fuji, Olympus, and Kodak, while capable are not up there with the leaders of the pack. The Lumix - made by Panasonic is an up and coming camera moving into the realm of Nikon, Canon, and Sony. They have been inovative in thier DSLR's offering a realtime and movable display on the back of the camera before the other companies did. Now, the others are also offering this on their DSLR's. Interestingly this is standard on the most inexpensive point and shoots.

In Part One of Choosing a Camera I spoke about the camera class that I am calling a hybrid - the camera that is a Point and Shoot with the look, shape, and features of a DSLR. Since starting this article I have done some research into the various brands that offer this type of camera. If you look in the photo department of your local electronics store you are going to see cameras made by Canon, Sony, Lumix, Kodak, and Nikon that look like DSLRs but are priced less than $400.00. Examine them closely and you will see that unlike the DSLR the lens is fixed to the camera and is not removable - but everything else looks so much like a DSLR. When you look through the electronic viewfinder you are looking through the lens - just like a DSLR. I am not going to repeat what I said in Part One, but I am going to tell you what I have learned looking at these cameras recently. If you want the most DSLR function in one of these "point and shoot" cameras you are going to want one of the Canon SX series. They have model numbers like SX10IS. The newest is SX1IS which adds High Def Video to the SX10IS model. Last years model - 8 mpx rather than 10 mpx, but in all other ways the same as the SX10IS is the SX5IS - still available and discounted. So what makes these Canons different than the other brands. One thing is that you can very easily add photographic filters and lens additions to the Canon. All that is required is an adapter sleeve which sells in camera shops for about $40 more. A ring on the camera lens unscrews and this sleeve screws on. The camera will now take standard size lens filters. Just screw them on to the front of the sleeve. The same sleeve accepts telephoto lens extenders and wide angle lens extenders which increase the already super range of telephoto function and wide angle function that are already built into the camera. Some of the other brands can do this but not as easily. and some only take filters and extensions made specifically for that camera. The view finder sceen on this camera can be flipped out of the back of the camera from its side and turned at various angles. This makes taking shop photos that you want to come straight down on a breeze when you set the sceen at 90 degrees to the camera. There is not a function on a DSLR that I have found that is not duplicated in some way on the Canon SX series. One I am asked to recommend a camera, this is the camera that I recommend. If you do not want any of these features, don't want anything that is the slightest bit complex, or want to not spend more than $200 to $250, then look at the Canon Powershot IS models or the Nikon Coolpix with Image Stabilization models.

Another factor to consider is whether the camera has a rechargable battery or uses regular alkaline batteries. The small point and shoots almost all have rechargable batteries. Some use regular batteries. I prefer cameras that use regular batteries - the ones that are available almost everywhere you go. For one thing, if you want rechargable you can put rechargable AA or AAA batteries into the camera. For another, if you run out of power and are near a convenience store they are going to have batteries for you to get your camera working again.

Here is another tip! If you are attracted to one camera or another in a store, go home and go online to that camera companies website. It is more than likely that the manual for that camera will be online as a free download. Download the pdf file manual and read through it. You will see how the camera works, how each feature is operated and know for certain what it can do and what it cannot do.

One thing that I must say is that you should not buy "cheap" because you want a camera that will last and one that will give you good photos when you need it. There are many discounts available on cameras. Almost every holiday has cameras being advertised at great savings - pre-Christmas, Fathers Day, Graduation season, vacation season. The store circulars are full of camera discounts. You may also find a good discount online - but don't buy online until you ahve held and played with that camera in a store. I was able to get a camera on a Pre-Holiday sale at a great price at a chain electonics store that would match prices. Right before the Holiday a local camera shop ran an ad that beat my great price by almost $40! I went into the store that I purchased the camera with the ad and got that price - the difference refunded to me! Don't be disuaded by the first price that you see. Cameras are often greatly discounted.

When you purchase your camera and bring it home the first thing you need to do is take out the manual and read it. Learn your camera before you take your first photo with it. You will then not be intimidated by your new camera in anyway and you will be able to easily use all of its functions. And don't lose that manual! I keep my manual with me in my camera bag so that it is always there should I not remember how to use a function.

Have fun with your new camera!

Choosing a Camera - Part 1

When you taking product photos of your crafts or art, you want to have a good camera, but very often the question comes up - "what camera should I buy?". What to buy is most easily answered with another question. What do you intend to use the camera for? When plunking down a hundred dollars or more, most of us want to buy a camera that will take good photos of a variety of things. Serious photographers often have more than one camera - each for a different application. Most of us have one. For the most practical camera in 2009 we are going focus only on digital cameras. Film is great but not very practical.

Before purchasing a camera you really want to think about what you might be using it for - in addition to taking photos for your online shop or sales catalog. Do you travel and take photos of the sites that you visit? Do you have children and want to take photos of all of those "special moments"? Do you take family snapshots? Would you like to start to get serious about photography as a hobby and an expression of art? Do you just want to take photos of your crafts? Or any or all of the above in combination?

How complicated a camera can you handle? Will a camera with a lot of dials and settings intimidate you? Would you just like to pick up the camera, turn it on, point it at the subject and push the button? More questions! But you need to answer each one even before you start looking. Oh yes, one more question - how much do you want to spend?

There are basically three basic categories of cameras available right now - Point and Shoot, DSLR (Digital Single Lens Reflex), and a new breed that has popped up in the last few years - a cross between the two. Point and Shoot cameras are fully automatic - yet they do offer you some setting that you can control when you are taking a photo. DSLR camera's have automatic features but you will need to turn the lens tube to zoom in and out to get the photo that you want and while most have auto-focus, you will want to use the lens to focus the lens yourself - again by turning it - which is one of the most prominent features of this type of camera. With a DSLR you will also be able to take the lens off easily and replace it with a lens of a different focal length giving you more options for wide angles, telephoto distances, macro photos, etc. The lens on DSLR's also allow you to place filters over the front of the lens. Filters change the light and create various effects on your photo. Most of the DSLR's, if not all, require an external flash to be attached to the camera for all flash photography. DSLR's are for the really serious interest in photography and while these are exceptional cameras, they are not for everyone. The third category of camera I have been calling a DSLR hybrid. These cameras look like small DSLR cameras. What you see through the eye piece and on the display screen is exactly what is coming through the camera's lens. Some of these add the abilitity to attach an external flash but also come with their own built in flash. Most models also allow you to add lens attachments - similar to the DSLR - including filters and various attachments that change the lens focal distance - again wide angle, macro, and telephoto. The main lens is not removed, but these attachments are screwed on to the lens on the camera. These hybrids also allow you to change the various auto settings on the camera very much as you can on a DSLR. You also have the ability to manual focus - though instead of moving the lens, you will do this electronically with a variable motion button.

Let's talk about cost. Frankly, they are all over the place. Point and Shoot camera's start at less than $50 and can go up to $300. DSLR cameras will start at about $450 and go into the thousands. Many DSLR cameras are sold without a lens - you buy the lens of your choice (generally always made by the same company that makes the camera). Many are packaged with one or two lens - of course, at a higher price. It does pay to look for those packages if you want a DSLR camera. The, so-called, Hybrids sell between $300 and $400 but are often discounted less.

When shopping for any camera you ABSOLUTELY want to look at, touch, and play with the camera. Do not buy a camera from a website - unless you have already gone to a brick and mortar store and played with it. When you go to a store, you can pick up the camera and feel it in your hands. Often the stores will have them plugged in so that you can try them turned on - try the focus, try the zoom, try the macro mode, see the settings, look at the menus, etc. You can't do this on a website and no matter what you read and learn about a camera you want it in your hands before your buy it.

I will continue this article in Part 2 talking about various brands, etc. Before that, I recommend that you read this article (if you have not already done so) to learn what you want in your camera if you are taking shop photos.

Wednesday, June 3, 2009

Basic Product Photograpy - The Series

For the past six weeks there have been a series of articles on this site about the basics of taking product photographs to be used on a website, a web store, or in print in a catalog. To make it easier to refer back to these articles I will list the links below. If new related articles are written in the future, those links will be added as they occur.

BASIC PRODUCT PHOTOGRAPHY

Part 1 - Cameras, Equipment, Etc.

Part 2 - Shooting Outdoors

Part 3 - Shooting Indoors

Part 4 - A Better Way to Shoot Indoors - Light Tents

Part 5 - Editing Software

Part 6 - Image Editing

Choosing a Camera - Part 1

Choosing a Camera - Part 2

Wednesday, May 27, 2009

Basic Product Photography - Part 6

When you look at your image on the screen of your monitor you are looking at an image that is the result of the settings and profile of your particular monitor, your graphics card, and your operating system's color profile. What you see may not be what I see. What may look like a yellow tone on your monitor may come across with an orange tone on mine. What is light on one monitor may be darker on another. This is just a fact of computers.

You can adjust all of this using software and a set diagram of colors to match from print to monitor, but if my monitor is not adjusted the same way, I am still going to see something different than you are seeing. So the basic rule of thumb - make it look good on your monitor with your preferred image editing software - as we spoke about in the last article - and hopefully what I see will be close to what you see. You can't worry too much about this - if at all.

When you look at your image, you need to decide first, does it have anything in the image that you do not want to have in your finished photo of your product. Is the product where you want it - do you need to center it? Are there dust spots that were on your background or ground fabric? Let's correct for this first.

Go to your cropping tool and set it on freehand or freestyle. This will allow you to crop without restriction to any particular size. When the cropping box comes on the screen you can move it around and make it bigger or smaller. Usually the part of the photo that will be taken out is darkened while you do this so that you can see exactly what you are going to get. If it is not check the crop settings because you should be able to have it do this. Got what you want. Crop it with a click of the check mark or whatever your software has to click on.

Now look at the photo again. Is there dust on the cloth? The clone tool will take this out. But be careful and do not over do this. This tool works by clicking on a good part of background close to the dust spot - a place that is exactly like the background under the dust. Then by clicking on the dust spot you will replace it with the background sample. Use a small brush point cursor and always remember that your sample selection will move each time you move to a new spot to replace. There will be an X on the screen that will show the sample spot. Make sure that is always what you want it to be or just select a new sample as you did the first time.

So now you have an image that is clear of stray marks. The next thing to look at is the image itself. Is it too dark? Too light? Do the colors of the product in the photo match the colors of the actual product? PS Elements, Corel Paintshop Photo Pro, and Picassa have autocorrect tools. These are generally found in the menus under Image. Open that tool and you will see a screen with slider bars and a sample of your image. There is another tool called quick fix that will do everything in one step without any input from you. Try that first if you like. If you do not like the result, then click on UNDO in the edit menu to get back to where you were before that correction. In the more extensive tool you will see a box that says PREVIEW. Click a check mark into Preview. Your corrections will now appear on the full image on your screen. No permanent changes will take effect yet. If there is an auto box, click on that. It will set the image to how the software thinks it should look. This is the same as clicking on the quickfix tool. Now go to the sliders - there may be one for color, brightness, contrast, highlights. shadows, focus/sharpness and if you open advanced features on this tool you may even have a slider for white balance. Move each of these sliders around until you get the image that you want. You should not need to do to much correction if your camera is doing its job. When you see what you like then click the finish or done button and your changes will be saved to your image. Now what you see on the screen is what you are going to get. If you hate what you see go to the Edit menu on top and click UNDO and start again with this last step.

The final thing to do is get your image to the size that you need it. This actually may all you need to do if your image came out of the camera exactly as you want - which is should. Go to the Image menu and look for Resize or Resize Print. You do not want "Resize Canvas". You will now see a box open where you can put in settings to resize your photo. Remember this - always make smaller - never make bigger. Unless you are very experienced with your image software you will get a poor image if you try to enlarge it. If you are shooting with your camera set at a high res/high pixels you are going to be working with a large image, so you will not need to even think about enlarging the image. Make sure that the box that says Constrain Proportions is checked - otherwise your resize may distort your image. Sites such as Etsy have a maximum number of pixels for a photo that you may upload and have displayed. The Etsy maximum is 1000 pixels in width. I always use that and let the software determine the length. Put 1000 into the top width box. A number will appear in the length box automatically. Make sure that the box next to these shows Pixels. You do not want anything else in that box - especially not inches! Click on resize or done at the bottom of the box and your image is sized for the website. If I have an image that is long and thin, then I will put the 1000 in the length box instead and resize that way. This will work too.

Look at your image. Your result could be that when uploaded to your shop the image will go beyond the thumbnail image box but it will look perfect when viewed on the item page. If this bothers you then when you crop, you must crop as close to square as you can. This is not always possible to get what you want into your image. It is a trade off as to the thumbnail view exactly matching the full item listing view - or re-shoot from a further distance to be able to crop square.

When you have completed all of these steps save your image using the SAVE AS command and not SAVE. You want to keep your original, at least until you upload your image to your shop, just incase you want to come back and recrop.

There you have it! All of these articles and all of this time, but you have a great product image in your shop, on your website, or in your print catalog!

Future articles will cover other suggestions for taking good product photos. Keep watching for an article just about the different types of tripods.

Wednesday, May 20, 2009

Basic Product Photography - Part 5

If you have been reading through this series of articles you now have taken your product photos and they are in your camera ready to transfer to your computer. I am not going to go into getting them from your camera to your computer because I am sure that is something you already know how to do. But once they are in your computer - now what?

If you have followed the suggestions in this series your photo files when viewed on the screen should be ready to use with just the adjustment of size, but it is possible that for whatever reason the lighting was off, the focus was not exactly what you wanted, the colors are not exact or the image white areas have a yellow tone. These are all relatively easy to fix if you have the right photo image software on your computer. Sometimes you are going to look at a photo that is way off - the best thing to do is save yourself a lot of time and effort and just delete it. If it was crucial to what you want to present in your series of photos of one product, just set up the shot in your easy to reassemble studio and shoot it again. In fact, if at all possible leave the studio space set up until you look at the photos on your computer - then it will be very easy to go back and re-shoot.

There are many software packages. If you are going to spend money on image software, do not spend it on a very inexpensive program. You are going to be far better off with a free program that you can download from the Internet than a $29.99 bargain box image software package off the shelf. I am going to give you suggestions for both free software and software packages that are for sale.

I am going to start with the king of all image software and that is Adobe Photoshop. You have all heard the name. There are many magazines dedicated solely to its use. Photoshop is a great program - but it's price is as large as its reputation and you can spend upwards of $700 for Adobe Photoshop. The current version is CS4, but be warned there are problems with CS4 that have yet to be corrected in the several months that it is out. If you have an older graphics card - meaning even a few of years old, the software crashes. Not so good, especially when you plunk down 700 bucks and don't know this until you install it and try to run it. The older version - CS3 is much more stable and has just about every feature of CS4. If you would like to try Photoshop you can download a free 30 day trial copy. It will stop working in 3o days after you install it but you will see how it works, if it has a problem with your graphics card, and if you like it. You are getting a trial of CS4. If you want to find CS3 you are going to have to do some searching.

Photoshop is a complex and somewhat complicated program for anything but the basics. If you are not ready to commit to learning the package then this is not for you. There are many books that will step you through how to use it. There are many on-line tutorials that will do the same. But there is a learning curve involved here and there is little click and go and you have what you want.

At the completely opposite end of the price range is a free program available for download that is a Photoshop-clone. It is called Gimp and it is easy to find for download for any computer system from PC to Mac to Linux. Gimp is called open source software which means it is developed for any operating system, continually re-developed to add more function, and it is offered for free. Gimp is very similar in operation to Photoshop with a few exceptions. It also has a bit of a learning curve but there are many tutorials available on the web to give you a basic understanding of what you will need to do to correct your image photos. The one thing that I have found about Gimp that I do not like is that cropping an image to a specific size is not straight forward as it is on all other image software that I have tried. On most image programs to crop you simple put in the size of the photo that you want the image reduced to and you get a box on your screen to move around your image and crop. The part of the image is now that size . On Gimp you have to determine the proportion of the size that you want - for example, if you want an 8 x 10 final image you need to enter 4:5 into the controls - you then get your crpping area to move around. I am not sure why they did this as it is much easier just to put in the size. This is not much of an issue with product images because you are going to crop (if you want to) freehand - which means to no set size and just adust the bars on the sides of the image to crop out any area you do not want. Gimp is free. Download it and try it. You have nothing to lose but a little time and a lot to gain. The current version is Gimp 2.6

If you like the features of Adobe Photoshop but wish that they were easier to use then you want to purchase Adobe Photoshop Elements. The most recent version is Elements 7. This is has all of the most useful features of Adobe Photoshop but it can do with with a few simple clicks. It sells for less than $75 and can often be found on sale at many retailers for less. You may still want to get a book about PS Elements 7 as it will teach you all the ins and outs of its features - and with a little effort you will be a pro. With Elements you are also getting a photo organizer and tools to do craft photo projects. Don't let the projects section make you think that this is a simplistic program. Photoshop Elements 7 (or any version) is a powerful image editing software program that encorporates ease of use.

There is a free software package similar to PS Elements, but in my opinion, not as good and, again in my opinion, does not give the quality of results that you can get with Elements - at least with as little effort. This software is called Picassa and is free. Again, try it. It will do basic things. When I first tried it I though that I was getting great results and then looked later at the photos and found some of the autocorrections to be overdone.

My final photo software suggestion is Corel Paintshop Photo. The current version is X2. I like version X1 much better. I find the older version to be much more stable and the controls easier to use for fast, one click, slide a little and click corrections. This is my software of choice for fast corrections on a product image. It is quick and easy and does what I need it to do. When it comes to more professional images - those that I create to sell, I do not use this software as it makes a bigger job of real fine tuning that it needs to. But as I say, for product photos it is fine. This package sells for under $100.00.

The basics of photo correction are all basically the same on each of the packages. If you know how to use one you pretty much can find a similar tool and control on the other - and it will generally work the same way.

This article has come far and I hate to say this but we will continue with how to use this software for your product images next week.

To be continued...

Wednesday, May 13, 2009

Basic Product Photography - Part 4

We have come on a long journey of helpful ways to take photos of your art or craft works to sell on internet sites or in catalogs. All of that has lead to this article in which I will tell you about a way to eliminate all of the complications that result from what I presented in Part 3 to create your home studio. Remember that I spoke about indirect and diffused lighting and creating neutral backgrounds that involved creating boards to hang them on. I am going to be the first to say that is a real pain. You want an easier solution than that and a way to work your lighting so that you can achieve the soft, no shadow light that you want. Why did I go through all of that then in Part 3 - because not everyone wants to make this small investment. And that investment is in a light tent.

A light tent is an enclosed cube with translucent walls that allow light to pass through on four to five sides. Many web sites have instructions to make one and what can be made will work - but rarely are you making something that will be easy to store and that folds conveniently away. I have found an inexpensive light tent that is just like the more expensive tents sold in camera stores. I wish that I had found this before I purchased mine which I bought in a camera shop for about $75.00. This one is half the price. I is found at a company called Harbor Freight. Harbor Freight is a tool retail company that sells imported tools as well as gadgets. They have a web site, a print catalog, and retail stores around the US. I first saw the light tent in person at one of their stores. Here is a link to the tent on their web site. They call it a photo tent (same thing) and it sells for $28.99. This is a great price and makes going through the time and effort of collecting the parts and making one not worth the effort. I have no stock in Harbor Freight and I get no commissions. I just think that this is an ideal way to get an essential part of a home product studio for very little money.

As I said, I do not have this inexpensive light tent. I paid twice the amount for the same thing. Here is a photo of my home product photo studio. My studio is set up in my basement. And this part of the basement is a small room that also contains the furnace, the heating oil tank, and the washer/dryer. You can see how nicely this fits into a limited space and the best part is it all can be folded up and put away. Commercial light tents like mine and the one that is sold by Harbor Freight fold flat. Now, there is a trick to folding them that takes a bit of practice, but once you get it and realize that the frame is flexible enough to twist as it is needed to be twisted to automatically fold down, it becomes easy. The tent is sitting on a square board that is just the size of the tent and that board sits on a folding "Workmate" work table made by Black and Decker. The Workmate is there in the basement to use to work on projects so it was an ideal choice spot for my studio set up. It could just as easily be a folding card table. In the photo you can see the light arrangement that I use and you now can see the lights that I spoke about in Part 3 - around $6 each at Home Depot stores, Walmart, etc. I like the third light above to add extra light and knock away any shadows that I can't get rid of with the two side lights. The advantage of a basement is that you can put a nail in beam above and do no harm so the top light hangs down from a strip of wood with a hole drilled into it at the top and the lamp clips at the bottom. The two side lights are clipped to old folding music stands. This makes them easy to move and direct to where I want the light inside the tent. As you can see the lights are outside the tent and shine through the walls. This diffuses the light. The lamps are pointed to give the best light on the object being photographed. With this set up there is no need for a flash. You cannot see in the photo that in front of the tent and table is an overhead flourescent shop light. I will often put this light out so that it casts no shadows inside the tent. I have also kept that light on and compensated for it with the tent lights. You are standing in front of the opening so it is unlikely that any light will come from the front, but if it is a concern this particular tent included a front that velcros on with a split in the middle for the camera. On the Harbor Frieght tent you will see in their photo that the front is a small circular opening which also cuts the forward light. In one small easy to set up space you have everything that you need to set up, take down, and set up again your product photo studio.

Now what about the background? Again, I recommend the flannel that I spoke about in Part 3 and in the same nuetral colors. The tent that I purchase also included backgrounds - velvet look panels in red, blue, and black. These each have velcro on the back at the corners and attach to velcro that came inside the tent. Because they have the velvet look they do collect dust particles that need to be removed before shooting your photos. A bit of velcro sewn on to fabric panels that you make easily allow you to attach the panel inside the tent. And the panels cover the back and the floor of the tent - taking care of the all that will be seen under and behind the item you are photographing. The Harbor Freight tent does not include panels but does include "hook and loop" fasteners (velcro) inside to hang your backdrops.

Here is a view inside my tent. You can see the black panel that is included. On top of that I have draped light grey flannel over a small cardboard box. This was for the set up of photos of the lucet that I sell on Etsy. I lean the item on the fabric and against the side of the box so that it stands. I do not use a tripod as my camera has excellent image stabilization so I can handhold the camera while taking perfect macro photographs. I stand in front of the tent and shoot away. If you are going to use a tripod as I recommended in Part 1 then you would set that tripod up in front of the tent. We are going to talk more about tripods in a later article.

Simple, easy, and certainly portable - the light tent weighs next to nothing and folds flat to about a square foot or less.

Next we will talk about what to do with the images once they are in the camera.

To be continued...

Thursday, May 7, 2009

Basic Product Photography - Part 3

In our last article we talked about shooting your product photos outdoors. In this article we are going to move your photo "studio" indoors. There is more to shooting inside than putting your item down on the kitchen table and taking out your camera. Believe me, I have tried it when I have been in a hurry and there are always problems.

When shooting indoors there are three things that must be taken into consideration - lighting, shadows, and background. If you control these three things you will easily take good product photos.

While you do not have to dedicate a space for your photos full time (who has room for that?) you are going to want to determine a space that you will always come back to when you need to take photos. Look around your house - or apartment - and find a space that you can take over for the times when you need to take photographs of your craft or art work. This space needs a table or counter that is already there all of the time or a place to put a small folding table. The height of the table needs to be comfortable for you to work on so a low to the floor, living room, coffee table is not ideal. Your kitchen table will work. The table on which you create your craft will work (as long as you don't keep your tools out all of the time - you don't want to need to completely clean up and put everything away every time you need to take a photo. If you do and you are like me, you will never take any photos.) Find your space and use that space every time.

Now to start controlling each of the three variables mentioned above. First let's talk about lighting. If you see a picture of a professional photographers studio you will see that several lights are used to light the subject. Look closely at those lights and they usually are facing away from the subject and there are reflective umbrellas in front of them which bounces the light toward what or who they are taking the photo of. They do this to get indirect light focused on the subject. Another method (more used years ago than now) was to put translucent covers on the front of the lights. Indirect light or diffused light provides a soft light that will not create a glare on what you are photographing. Generally, these photographers are not using a camera flash pointed at the subject because the flash will cause a glare as well. So you want to create a situation where you can get good light on your item that is not pointed directly at it and not use your camera flash. Digital cameras can adjust to take photos with very little light. Two problems can result from that - one is that it will set the speed that your shutter opens and closes too low - so the very slightest movement will cause blur - and the second is that the camera will change the ISO setting to one that is so high that small blotch spots will result on your image called "grain". When cameras more commonly used film, the film would be sold to work at a certain ISO setting. You would set your camera to what the ISO setting was on the film box. Then as now, the higher the setting and the lower the light, the more likely you would get grain on your photos. Technology on digital cameras has pushed the level way up from what film settings will result in, but as you approach 1000 ISO and beyond you are going to have to deal with grain. Some image software has corrections for grain, but none really work as well as taking your photo correctly to start. For product photos leave your ISO setting on "AUTO" and let the camera handle it. As long as you are providing the right light this will not be an issue. Your tripod and a steady hand pushing the shutter button will stop the blur from a low shutter speed. But again, sufficient light makes this problem go away.

So what are you going to do about light. Your room lights may cause you a problem. Ceiling lights too close to your shooting space can cause an overhead glare. Try to offset your photo space out from under overhead lights. You are going to need lights to take your photos. No, you don't have to spend a lot of money. The cheapest way to deal with this is to purchase clip on utility lights at a home or discount store. These lights sell for about $6.00 each and use regular household light bulbs. The lamp has a metal clip on the bottom and a large, round, metal hood around the bulb. I use incandescent light bulbs but you could use the new twist shape fluorescent bulbs that everyone thinks are so wonderful right now. Let me caution you right here - those bulbs are EXTREMELY dangerous if they break. Read the package. You are supposed to deal with the broken bulb and the room as if a hazardous substance spilled. I am not going to get into this now, but use incandescent light bulbs in your photo lights. You are going to be moving them around and there is too much risk that something is going to fall and break and you do not want to be dealing with that so called "green" bulb if it breaks. You are going to want at least two lights. As you read further you will see why you might want three.

You are going to need to be able to clip these lamps to your table in front of the spot that you are going to place your item - one on each side. By directing the two lights you can eliminate one of the the other variables above - shadows. Two lights with their beams or light crossing each other will eliminate shadows. When two don't do it, a third light from above added into the mix usually will. Set your item down - on its photo display (just like we talked about in the last article) and start moving your lights so that there are no shadows and no glare - and, obviously, so that the lamps are in no way in the picture. Now, I talked about indirect or diffused light - we'll get back to that.

Let's move, for a moment, to the last variable - background. Look behind your item and what do you see. Whatever it is, it is going to be in your picture in some way - even if it is blurred out. Look down at your table under your item and what do you see? That too is going to be in the image. You can also get glare coming up from the table top. Let's do something about that first. A neutral solid color piece of fabric makes a nice "table" cloth to go under your item. Some colors work better than others. Avoid white because you are going to struggle more in correcting the white balance of the cloth in the picture than of the item. Light blue is good. Light grey is good. Light tan is good. If your item is very light in color you might even want to use black. I like to use flannel. It gives a softer look to the cloth when photographed - and it is inexpensive in fabric stores. It will also absorb light rather than reflect the light - which is something that you want when you are looking to avoid light where you don't want it or that you cannot control. As to what is behind your picture... A cloth backdrop works well here too. Again, the same solid colors in a cotton flannel are recommended. Do not use a pattern. Remember, you want to focus attention on the item - not what is behind it or around it. A pattern - even a subtle one will bring the eye away from the item. Attach the cloth to a board that will stand at 90 degrees to the table - and won't fall over. You can purchase corrugated plastic in many craft and hobby stores in poster size sheets. It is easy to cut with a razor knife and you can attach your fabric to it. Cut it down to a managable size but large enough to fill the background of your photo in the space that you are working in. Use the remaining plastic board to create a stand - much like the ones that you find on the back of table picture frames.

You now have your space set up. You know how to but it up and take it down - and more importantly you can put it up exactly the same way the next time that you need it. Set your item in place and start moving your lights so that you have no shadows either on the background or on the table. Now I am going to repeat what I wrote in the second article - At this point you are ready to shoot and all you need to do is swap your items in and out of this position on your table to take your photos. Set up your tripod in front of the object (or get into a comfortable position with your Optically Image Stabilized camera with no need for a tripod), set your camera to Macro mode, set your white balance to sunlight, and check the distance that you are from your object. If you are within the macro range specified for your camera then you are ready. If not, then move your tripod or yourself to where you need to be. You might even want to use a ruler or tape measure to make sure you are where you must be. Check each photo on the screen of the camera as you shoot each shot - look closely and you will see if you are ok or you need to make an adjustment. Always take several shots of each set up object. It costs you nothing and it is all disposable and you are only limited by the size of the memory card in your camera.

All of this will work, but this set up has its pitfalls. There is a much simpler way to accomplish all of this. For just a small expense you can get yourself a light tent. And that will be discussed in the next article - when we also get back to all those things that I said I would get back to.

To be continued...

Monday, April 27, 2009

Basic Product Photography - Part 2

In the first part of this series we talked about the features that you want in a camera to take good product photos of your crafts. We will now explore what is needed to set up the pictures that you are going to take. But before we do, let's add one more thing to your camera.

All digital cameras should take a memory card of one type or another. One of the most common is an SD Card (SD for Secure Digital). You want to get a card for your camera with two features - one, that it is as large a capacity as you want to pay for and two, that it is a "fast" memory card. Memory these days is cheap. You can get a large capacity card for as little as ten dollars in the right stores. Two gigabites (2 gb) is the largest capacity that an SD card comes in. Some cameras that take SD cards MAY also take SDHC cards which are High Capacity Secure Digital Cards. These cards are always more than 2 gb - from 4 gb and way up. Some cameras will only work to a certain capacity card and you may want to look into this BEFORE you purchase a camera. Not all cameras that work with regular capacity cards willwork with high capacity cards. This is all common and easy to know by looking at the package when you are purchasing a card. The second feature is not so obvious and easy to know - the speed of the card. The faster the speed the faster the time is between the moment you press the camera shutter button, the picture is taken, and the camera becomes ready to take the next picture. For product photography this is not essential - but you paid enough for your camera to want to use it for other things, right? Not all of the brands of memory cards will even mention speed. Some do by describing the card as good for video - video needs a fast card. Some do by placing a number after model names - Ultra, Ulra II, Ultra III. Some cards will specify a rating. A "D" rated card is perfect for digital cameras and is fast. If the only card you can find has an unknown speed don't knock yourself out trying to find one, but if you can find a fast card get one. Now that you hvae your camera set up to take hundreds to thousands of photos - yes, higher capacity cards will hold thousands of photos - you are ready to get shooting.

In some way you need to create a photography studio - nothing elaborate but a place to take your photos. The simplest studio is the great outdoors. You can set up your object to be photographed outside which eliminates the greatest necessity for indoor photo shoots and that is proper lighting.

Taking product photos outside requires a clean table (picnic tables left out all year are not always the most desirable places to layout your beautiful craft piece), a place with a neutral background, and something that you can rig around the object you are photographing that will stop any wind from moving it. This last part may or may not be necessary due to the weather and the season - or your determining whether or not to shoot based on the wind that may or may not be blowing. You do not want to fight the wind when you are shooting a macro or closeup photo. Remember, from the first article - the slightest movement will blur a macro photo. Even with image stabilization if the wind moves what you are shooting you are not going to get a good shot. First, it moved - out of the position that you will take so much care in putting it into to take the picture. Second, the movement is going to change the picture - even if shooting with a fast shutter speed which can capture objects in motion - but generally with a price in quality.

Set your table up in a clear spot with attention to anything that results in a shadow falling on the table top - trees overhead, edges of buildings, etc. When you look at the surface of the table you should see a nice and brightly lit from the sun clear surface. The position of the sun will effect the shadows that may be created on your object. At noon the sun is overhead, but at other times of the day you may want to adjust your position by the direction that the sunlight will fall on your object and then the table. The sun behind you may cause unwanted shadows. The sun in front of you may cause a problem in the proper lighting adjustment of the auto adjusting camera lens. The best thing about a digital camera is that you can see immediate results and then with the simple click of a button erase those results, make adjustments, and start again.

If you are photographing an object that does not stand on its own you will need something to hold and display your piece on to photograph it. This is where imagination can come in or you can resort to standard displays - much like or exactly what you use to display your work for sale at craft fairs (presuming you do craft fairs). There are all types of jewelry displays, mannequins, etc. that may be used. You may want to step outside the common box and look for artistic things to display your piece on such as large rocks, shells, etc. Just be sure not to display your work on anything that is going to distract the eye from what you want the buyer to see most - YOUR WORK. I have seen many product photos that I have to look at for several moments until I figure out what is being sold . They are all very nice pictures, but I see the shell before I see the earrings. You can just get a piece of neutral color fabric and pin your work (if it can be pinned) and have that fabric placed over a cardboard or wood that is made to stand on the table. When you have set up your piece exactly as you want it on the display put it down on the table - or set it up on the table if moving it will cause it to move out of place. Now, look behind what you are photographing. What do you see? Do you see your neighbor's swing set? Do you see a trash dumpster at the building next door? Take a test photo and see if that item in the distance has blurred away to the point that is is unrecognizable - it should when shooting in macro mode. If it doesn't you need to move your work in another direction so that you have a non-distracting background behind your object in the photograph.

At this point you are ready to shoot and all you need to do is swap your items in and out of this position on your table to take your photos. Set up your tripod in front of the object (or get into a comfortable position with your Optically Image Stabilized camera with no need for a tripod), set your camera to Macro mode, set your white balance to sunlight, and check the distance that you are from your object. If you are within the macro range specified for your camera then you are ready. If not, then move your tripod or yourself to where you need to be. You might even want to use a ruler or tape measure to make sure you are where you must be.

Check each photo on the screen of the camera as you shoot each shot - look closely and you will see if you are ok or you need to make an adjustment. Always take several shots of each set up object. It costs you nothing and it is all disposable and you are only limited by the size of the memory card in your camera.

Outdoors, the perfect studio! Well, not really. As you can see on the clearest day you have to contend with shadows, a breeze, what is behind your yard, and where the sun is. Outdoor shooting is a great thing and many use it, but what do you do if you need to shoot pictures for a new internet listing and it is raining and the forcast has rain for days - or if you would like to shoot at night - or it is 98 degrees or 12 degrees outside?

No outdoors is not the perfect studio. Sometimes you are going to need to move indoors - and for that you must wait for our next installment....

To be continued...