In my last article I started talking about what to know when choosing a camera. Now we are going to get a little more specific.
Let's start with Megapixels. Every digital camera will boast about how many megapixels the camera has. What does all of this mean? The larger the number of megapixels, the larger the image file size will be and the more detailed (supposedly) the image will be in the photograph. I say supposedly as there is some debate in the photography world that there are just so many megapixels the sensor in current camera technology can process and exceeding that makes no difference or can even have a negative impact. Never the less, the newest models are always more megapixels than last year's model. The newest models are at 15 plus mpx. But these are also the most expensive cameras. Expect to pay more for more megapixels no matter what category of camera you are looking at. Also keep in mind that high megapixel cameras can often be set to shoot photos at lower megapixel settings to save file space, but if you are going to never set your 10 mpx camera higher than 5 mpx, why pay that much more for your camera? I am not saying don't get as many mpx as you can afford - I would, but this is something to consider if you are on a budget and anticipate limited use of your camera for web photos (which need to be small anyway).
What brand camera is good? I am not going to say that any one brand is bad, but I will tell you that some brands are considered the top by serious photographers. At the top of the list are Canon and Nikon. These companies have been making film cameras for many, many years before they started making digital cameras and they bring their expertise and quality to all of the cameras that they make. Nikon has always had a reputation for one of the best lenses. Canon also has excelled in some of the features that they build into their cameras and thier lenses are also quality lenses. I have found the features in Canon digitals to surpass those in Nikon. Either one is going to take an excellent photo. Sony has been giving both companies competiton. Their expertise is electronics and they are concentrating that into their digital cameras. When I was looking for my last camera, Sony was my second choice, but Canon had more "camera" function in the model I was looking for.
I am going to jump off here to talk a bit about Canon. Many recommend the Canon Powershots - I agree with that recommendation but must add pick a model with IS in the name - IS for Image Stabilization. I spoke about this in this article. Canon has exceptional image stabilization in their IS models. This can eliminate the need for a tripod in many situtations. This can help anyone with "shaky" hands when trying to hold the camera still. Another create feature in many Canon's is "super macro", a macro mode beyond macro that will allow you to get so close to the subject that you have to be careful that you do not hit the lens with what you are taking a photo of. There may be other camera brands that do this, but from experience I can recommend Canon - as do many.
Is this going to just be a Canon ad? No. I have owned a number of cameras. Fuji has had nice features on thier cameras. Olympus has as well. But Fuji, Olympus, and Kodak, while capable are not up there with the leaders of the pack. The Lumix - made by Panasonic is an up and coming camera moving into the realm of Nikon, Canon, and Sony. They have been inovative in thier DSLR's offering a realtime and movable display on the back of the camera before the other companies did. Now, the others are also offering this on their DSLR's. Interestingly this is standard on the most inexpensive point and shoots.
In Part One of Choosing a Camera I spoke about the camera class that I am calling a hybrid - the camera that is a Point and Shoot with the look, shape, and features of a DSLR. Since starting this article I have done some research into the various brands that offer this type of camera. If you look in the photo department of your local electronics store you are going to see cameras made by Canon, Sony, Lumix, Kodak, and Nikon that look like DSLRs but are priced less than $400.00. Examine them closely and you will see that unlike the DSLR the lens is fixed to the camera and is not removable - but everything else looks so much like a DSLR. When you look through the electronic viewfinder you are looking through the lens - just like a DSLR. I am not going to repeat what I said in Part One, but I am going to tell you what I have learned looking at these cameras recently. If you want the most DSLR function in one of these "point and shoot" cameras you are going to want one of the Canon SX series. They have model numbers like SX10IS. The newest is SX1IS which adds High Def Video to the SX10IS model. Last years model - 8 mpx rather than 10 mpx, but in all other ways the same as the SX10IS is the SX5IS - still available and discounted. So what makes these Canons different than the other brands. One thing is that you can very easily add photographic filters and lens additions to the Canon. All that is required is an adapter sleeve which sells in camera shops for about $40 more. A ring on the camera lens unscrews and this sleeve screws on. The camera will now take standard size lens filters. Just screw them on to the front of the sleeve. The same sleeve accepts telephoto lens extenders and wide angle lens extenders which increase the already super range of telephoto function and wide angle function that are already built into the camera. Some of the other brands can do this but not as easily. and some only take filters and extensions made specifically for that camera. The view finder sceen on this camera can be flipped out of the back of the camera from its side and turned at various angles. This makes taking shop photos that you want to come straight down on a breeze when you set the sceen at 90 degrees to the camera. There is not a function on a DSLR that I have found that is not duplicated in some way on the Canon SX series. One I am asked to recommend a camera, this is the camera that I recommend. If you do not want any of these features, don't want anything that is the slightest bit complex, or want to not spend more than $200 to $250, then look at the Canon Powershot IS models or the Nikon Coolpix with Image Stabilization models.
Another factor to consider is whether the camera has a rechargable battery or uses regular alkaline batteries. The small point and shoots almost all have rechargable batteries. Some use regular batteries. I prefer cameras that use regular batteries - the ones that are available almost everywhere you go. For one thing, if you want rechargable you can put rechargable AA or AAA batteries into the camera. For another, if you run out of power and are near a convenience store they are going to have batteries for you to get your camera working again.
Here is another tip! If you are attracted to one camera or another in a store, go home and go online to that camera companies website. It is more than likely that the manual for that camera will be online as a free download. Download the pdf file manual and read through it. You will see how the camera works, how each feature is operated and know for certain what it can do and what it cannot do.
One thing that I must say is that you should not buy "cheap" because you want a camera that will last and one that will give you good photos when you need it. There are many discounts available on cameras. Almost every holiday has cameras being advertised at great savings - pre-Christmas, Fathers Day, Graduation season, vacation season. The store circulars are full of camera discounts. You may also find a good discount online - but don't buy online until you ahve held and played with that camera in a store. I was able to get a camera on a Pre-Holiday sale at a great price at a chain electonics store that would match prices. Right before the Holiday a local camera shop ran an ad that beat my great price by almost $40! I went into the store that I purchased the camera with the ad and got that price - the difference refunded to me! Don't be disuaded by the first price that you see. Cameras are often greatly discounted.
When you purchase your camera and bring it home the first thing you need to do is take out the manual and read it. Learn your camera before you take your first photo with it. You will then not be intimidated by your new camera in anyway and you will be able to easily use all of its functions. And don't lose that manual! I keep my manual with me in my camera bag so that it is always there should I not remember how to use a function.
Have fun with your new camera!
Showing posts with label advertising. Show all posts
Showing posts with label advertising. Show all posts
Wednesday, June 10, 2009
Choosing a Camera - Part 1
When you taking product photos of your crafts or art, you want to have a good camera, but very often the question comes up - "what camera should I buy?". What to buy is most easily answered with another question. What do you intend to use the camera for? When plunking down a hundred dollars or more, most of us want to buy a camera that will take good photos of a variety of things. Serious photographers often have more than one camera - each for a different application. Most of us have one. For the most practical camera in 2009 we are going focus only on digital cameras. Film is great but not very practical.
Before purchasing a camera you really want to think about what you might be using it for - in addition to taking photos for your online shop or sales catalog. Do you travel and take photos of the sites that you visit? Do you have children and want to take photos of all of those "special moments"? Do you take family snapshots? Would you like to start to get serious about photography as a hobby and an expression of art? Do you just want to take photos of your crafts? Or any or all of the above in combination?
How complicated a camera can you handle? Will a camera with a lot of dials and settings intimidate you? Would you just like to pick up the camera, turn it on, point it at the subject and push the button? More questions! But you need to answer each one even before you start looking. Oh yes, one more question - how much do you want to spend?
There are basically three basic categories of cameras available right now - Point and Shoot, DSLR (Digital Single Lens Reflex), and a new breed that has popped up in the last few years - a cross between the two. Point and Shoot cameras are fully automatic - yet they do offer you some setting that you can control when you are taking a photo. DSLR camera's have automatic features but you will need to turn the lens tube to zoom in and out to get the photo that you want and while most have auto-focus, you will want to use the lens to focus the lens yourself - again by turning it - which is one of the most prominent features of this type of camera. With a DSLR you will also be able to take the lens off easily and replace it with a lens of a different focal length giving you more options for wide angles, telephoto distances, macro photos, etc. The lens on DSLR's also allow you to place filters over the front of the lens. Filters change the light and create various effects on your photo. Most of the DSLR's, if not all, require an external flash to be attached to the camera for all flash photography. DSLR's are for the really serious interest in photography and while these are exceptional cameras, they are not for everyone. The third category of camera I have been calling a DSLR hybrid. These cameras look like small DSLR cameras. What you see through the eye piece and on the display screen is exactly what is coming through the camera's lens. Some of these add the abilitity to attach an external flash but also come with their own built in flash. Most models also allow you to add lens attachments - similar to the DSLR - including filters and various attachments that change the lens focal distance - again wide angle, macro, and telephoto. The main lens is not removed, but these attachments are screwed on to the lens on the camera. These hybrids also allow you to change the various auto settings on the camera very much as you can on a DSLR. You also have the ability to manual focus - though instead of moving the lens, you will do this electronically with a variable motion button.
Let's talk about cost. Frankly, they are all over the place. Point and Shoot camera's start at less than $50 and can go up to $300. DSLR cameras will start at about $450 and go into the thousands. Many DSLR cameras are sold without a lens - you buy the lens of your choice (generally always made by the same company that makes the camera). Many are packaged with one or two lens - of course, at a higher price. It does pay to look for those packages if you want a DSLR camera. The, so-called, Hybrids sell between $300 and $400 but are often discounted less.
When shopping for any camera you ABSOLUTELY want to look at, touch, and play with the camera. Do not buy a camera from a website - unless you have already gone to a brick and mortar store and played with it. When you go to a store, you can pick up the camera and feel it in your hands. Often the stores will have them plugged in so that you can try them turned on - try the focus, try the zoom, try the macro mode, see the settings, look at the menus, etc. You can't do this on a website and no matter what you read and learn about a camera you want it in your hands before your buy it.
I will continue this article in Part 2 talking about various brands, etc. Before that, I recommend that you read this article (if you have not already done so) to learn what you want in your camera if you are taking shop photos.
Wednesday, June 3, 2009
Basic Product Photograpy - The Series
For the past six weeks there have been a series of articles on this site about the basics of taking product photographs to be used on a website, a web store, or in print in a catalog. To make it easier to refer back to these articles I will list the links below. If new related articles are written in the future, those links will be added as they occur.
BASIC PRODUCT PHOTOGRAPHY
Part 1 - Cameras, Equipment, Etc.
Part 2 - Shooting Outdoors
Part 3 - Shooting Indoors
Part 4 - A Better Way to Shoot Indoors - Light Tents
Part 5 - Editing Software
Part 6 - Image Editing
Choosing a Camera - Part 1
Choosing a Camera - Part 2
BASIC PRODUCT PHOTOGRAPHY
Part 1 - Cameras, Equipment, Etc.
Part 2 - Shooting Outdoors
Part 3 - Shooting Indoors
Part 4 - A Better Way to Shoot Indoors - Light Tents
Part 5 - Editing Software
Part 6 - Image Editing
Choosing a Camera - Part 1
Choosing a Camera - Part 2
Wednesday, May 20, 2009
Basic Product Photography - Part 5
If you have been reading through this series of articles you now have taken your product photos and they are in your camera ready to transfer to your computer. I am not going to go into getting them from your camera to your computer because I am sure that is something you already know how to do. But once they are in your computer - now what?
If you have followed the suggestions in this series your photo files when viewed on the screen should be ready to use with just the adjustment of size, but it is possible that for whatever reason the lighting was off, the focus was not exactly what you wanted, the colors are not exact or the image white areas have a yellow tone. These are all relatively easy to fix if you have the right photo image software on your computer. Sometimes you are going to look at a photo that is way off - the best thing to do is save yourself a lot of time and effort and just delete it. If it was crucial to what you want to present in your series of photos of one product, just set up the shot in your easy to reassemble studio and shoot it again. In fact, if at all possible leave the studio space set up until you look at the photos on your computer - then it will be very easy to go back and re-shoot.
There are many software packages. If you are going to spend money on image software, do not spend it on a very inexpensive program. You are going to be far better off with a free program that you can download from the Internet than a $29.99 bargain box image software package off the shelf. I am going to give you suggestions for both free software and software packages that are for sale.
I am going to start with the king of all image software and that is Adobe Photoshop. You have all heard the name. There are many magazines dedicated solely to its use. Photoshop is a great program - but it's price is as large as its reputation and you can spend upwards of $700 for Adobe Photoshop. The current version is CS4, but be warned there are problems with CS4 that have yet to be corrected in the several months that it is out. If you have an older graphics card - meaning even a few of years old, the software crashes. Not so good, especially when you plunk down 700 bucks and don't know this until you install it and try to run it. The older version - CS3 is much more stable and has just about every feature of CS4. If you would like to try Photoshop you can download a free 30 day trial copy. It will stop working in 3o days after you install it but you will see how it works, if it has a problem with your graphics card, and if you like it. You are getting a trial of CS4. If you want to find CS3 you are going to have to do some searching.
Photoshop is a complex and somewhat complicated program for anything but the basics. If you are not ready to commit to learning the package then this is not for you. There are many books that will step you through how to use it. There are many on-line tutorials that will do the same. But there is a learning curve involved here and there is little click and go and you have what you want.
At the completely opposite end of the price range is a free program available for download that is a Photoshop-clone. It is called Gimp and it is easy to find for download for any computer system from PC to Mac to Linux. Gimp is called open source software which means it is developed for any operating system, continually re-developed to add more function, and it is offered for free. Gimp is very similar in operation to Photoshop with a few exceptions. It also has a bit of a learning curve but there are many tutorials available on the web to give you a basic understanding of what you will need to do to correct your image photos. The one thing that I have found about Gimp that I do not like is that cropping an image to a specific size is not straight forward as it is on all other image software that I have tried. On most image programs to crop you simple put in the size of the photo that you want the image reduced to and you get a box on your screen to move around your image and crop. The part of the image is now that size . On Gimp you have to determine the proportion of the size that you want - for example, if you want an 8 x 10 final image you need to enter 4:5 into the controls - you then get your crpping area to move around. I am not sure why they did this as it is much easier just to put in the size. This is not much of an issue with product images because you are going to crop (if you want to) freehand - which means to no set size and just adust the bars on the sides of the image to crop out any area you do not want. Gimp is free. Download it and try it. You have nothing to lose but a little time and a lot to gain. The current version is Gimp 2.6
If you like the features of Adobe Photoshop but wish that they were easier to use then you want to purchase Adobe Photoshop Elements. The most recent version is Elements 7. This is has all of the most useful features of Adobe Photoshop but it can do with with a few simple clicks. It sells for less than $75 and can often be found on sale at many retailers for less. You may still want to get a book about PS Elements 7 as it will teach you all the ins and outs of its features - and with a little effort you will be a pro. With Elements you are also getting a photo organizer and tools to do craft photo projects. Don't let the projects section make you think that this is a simplistic program. Photoshop Elements 7 (or any version) is a powerful image editing software program that encorporates ease of use.
There is a free software package similar to PS Elements, but in my opinion, not as good and, again in my opinion, does not give the quality of results that you can get with Elements - at least with as little effort. This software is called Picassa and is free. Again, try it. It will do basic things. When I first tried it I though that I was getting great results and then looked later at the photos and found some of the autocorrections to be overdone.
My final photo software suggestion is Corel Paintshop Photo. The current version is X2. I like version X1 much better. I find the older version to be much more stable and the controls easier to use for fast, one click, slide a little and click corrections. This is my software of choice for fast corrections on a product image. It is quick and easy and does what I need it to do. When it comes to more professional images - those that I create to sell, I do not use this software as it makes a bigger job of real fine tuning that it needs to. But as I say, for product photos it is fine. This package sells for under $100.00.
The basics of photo correction are all basically the same on each of the packages. If you know how to use one you pretty much can find a similar tool and control on the other - and it will generally work the same way.
This article has come far and I hate to say this but we will continue with how to use this software for your product images next week.
To be continued...
Wednesday, May 13, 2009
Basic Product Photography - Part 4
We have come on a long journey of helpful ways to take photos of your art or craft works to sell on internet sites or in catalogs. All of that has lead to this article in which I will tell you about a way to eliminate all of the complications that result from what I presented in Part 3 to create your home studio. Remember that I spoke about indirect and diffused lighting and creating neutral backgrounds that involved creating boards to hang them on. I am going to be the first to say that is a real pain. You want an easier solution than that and a way to work your lighting so that you can achieve the soft, no shadow light that you want. Why did I go through all of that then in Part 3 - because not everyone wants to make this small investment. And that investment is in a light tent.
A light tent is an enclosed cube with translucent walls that allow light to pass through on four to five sides. Many web sites have instructions to make one and what can be made will work - but rarely are you making something that will be easy to store and that folds conveniently away. I have found an inexpensive light tent that is just like the more expensive tents sold in camera stores. I wish that I had found this before I purchased mine which I bought in a camera shop for about $75.00. This one is half the price. I is found at a company called Harbor Freight. Harbor Freight is a tool retail company that sells imported tools as well as gadgets. They have a web site, a print catalog, and retail stores around the US. I first saw the light tent in person at one of their stores. Here is a link to the tent on their web site. They call it a photo tent (same thing) and it sells for $28.99. This is a great price and makes going through the time and effort of collecting the parts and making one not worth the effort. I have no stock in Harbor Freight and I get no commissions. I just think that this is an ideal way to get an essential part of a home product studio for very little money.
As I said, I do not have this inexpensive light tent. I paid twice the a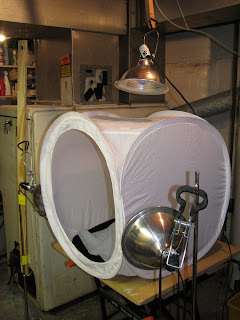 mount for the same thing. Here is a photo of my home product photo studio. My studio is set up in my basement. And this part of the basement is a small room that also contains the furnace, the heating oil tank, and the washer/dryer. You can see how nicely this fits into a limited space and the best part is it all can be folded up and put away. Commercial light tents like mine and the one that is sold by Harbor Freight fold flat. Now, there is a trick to folding them that takes a bit of practice, but once you get it and realize that the frame is flexible enough to twist as it is needed to be twisted to automatically fold down, it becomes easy. The tent is sitting on a square board that is just the size of the tent and that board sits on a folding "Workmate" work table made by Black and Decker. The Workmate is there in the basement to use to work on projects so it was an ideal choice spot for my studio set up. It could just as easily be a folding card table. In the photo you can see the light arrangement that I use and you now can see the lights that I spoke about in Part 3 - around $6 each at Home Depot stores, Walmart, etc. I like the third light above to add extra light and knock away any shadows that I can't get rid of with the two side lights. The advantage of a basement is that you can put a nail in beam above and do no harm so the top light hangs down from a strip of wood with a hole drilled into it at the top and the lamp clips at the bottom. The two side lights are clipped to old folding music stands. This makes them easy to move and direct to where I want the light inside the tent. As you can see the lights are outside the tent and shine through the walls. This diffuses the light. The lamps are pointed to give the best light on the object being photographed. With this set up there is no need for a flash. You cannot see in the photo that in front of the tent and table is an overhead flourescent shop light. I will often put this light out so that it casts no shadows inside the tent. I have also kept that light on and compensated for it with the tent lights. You are standing in front of the opening so it is unlikely that any light will come from the front, but if it is a concern this particular tent included a front that velcros on with a split in the middle for the camera. On the Harbor Frieght tent you will see in their photo that the front is a small circular opening which also cuts the forward light. In one small easy to set up space you have everything that you need to set up, take down, and set up again your product photo studio.
Now what about the background? Again, I recommend the flannel that I spoke about in Part 3 and in the same nuetral colors. The tent that I purchase also included backgrounds - velvet look panels in red, blue, and black. These each have velcro on the back at the corners and attach to velcro that came inside the tent. Because they have the velvet look they do collect dust particles that need to be removed before shooting your photos. A bit of velcro sewn on to fabric panels that you make easily allow you to attach the panel inside the tent. And the panels cover the back and the floor of the tent - taking care of the all that will be seen under and behind the item you are photographing. The Harbor Freight tent does not include panels but does include "hook and loop" fasteners (velcro) inside to hang your backdrops.
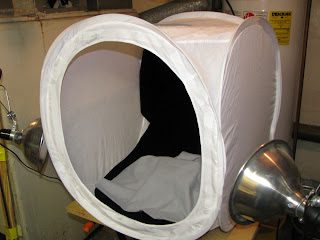 Here is a view inside my tent. You can see the black panel that is included. On top of that I have draped light grey flannel over a small cardboard box. This was for the set up of photos of the lucet that I sell on Etsy. I lean the item on the fabric and against the side of the box so that it stands. I do not use a tripod as my camera has excellent image stabilization so I can handhold the camera while taking perfect macro photographs. I stand in front of the tent and shoot away. If you are going to use a tripod as I recommended in Part 1 then you would set that tripod up in front of the tent. We are going to talk more about tripods in a later article.
Simple, easy, and certainly portable - the light tent weighs next to nothing and folds flat to about a square foot or less.
Next we will talk about what to do with the images once they are in the camera.
To be continued...
A light tent is an enclosed cube with translucent walls that allow light to pass through on four to five sides. Many web sites have instructions to make one and what can be made will work - but rarely are you making something that will be easy to store and that folds conveniently away. I have found an inexpensive light tent that is just like the more expensive tents sold in camera stores. I wish that I had found this before I purchased mine which I bought in a camera shop for about $75.00. This one is half the price. I is found at a company called Harbor Freight. Harbor Freight is a tool retail company that sells imported tools as well as gadgets. They have a web site, a print catalog, and retail stores around the US. I first saw the light tent in person at one of their stores. Here is a link to the tent on their web site. They call it a photo tent (same thing) and it sells for $28.99. This is a great price and makes going through the time and effort of collecting the parts and making one not worth the effort. I have no stock in Harbor Freight and I get no commissions. I just think that this is an ideal way to get an essential part of a home product studio for very little money.
As I said, I do not have this inexpensive light tent. I paid twice the a
 mount for the same thing. Here is a photo of my home product photo studio. My studio is set up in my basement. And this part of the basement is a small room that also contains the furnace, the heating oil tank, and the washer/dryer. You can see how nicely this fits into a limited space and the best part is it all can be folded up and put away. Commercial light tents like mine and the one that is sold by Harbor Freight fold flat. Now, there is a trick to folding them that takes a bit of practice, but once you get it and realize that the frame is flexible enough to twist as it is needed to be twisted to automatically fold down, it becomes easy. The tent is sitting on a square board that is just the size of the tent and that board sits on a folding "Workmate" work table made by Black and Decker. The Workmate is there in the basement to use to work on projects so it was an ideal choice spot for my studio set up. It could just as easily be a folding card table. In the photo you can see the light arrangement that I use and you now can see the lights that I spoke about in Part 3 - around $6 each at Home Depot stores, Walmart, etc. I like the third light above to add extra light and knock away any shadows that I can't get rid of with the two side lights. The advantage of a basement is that you can put a nail in beam above and do no harm so the top light hangs down from a strip of wood with a hole drilled into it at the top and the lamp clips at the bottom. The two side lights are clipped to old folding music stands. This makes them easy to move and direct to where I want the light inside the tent. As you can see the lights are outside the tent and shine through the walls. This diffuses the light. The lamps are pointed to give the best light on the object being photographed. With this set up there is no need for a flash. You cannot see in the photo that in front of the tent and table is an overhead flourescent shop light. I will often put this light out so that it casts no shadows inside the tent. I have also kept that light on and compensated for it with the tent lights. You are standing in front of the opening so it is unlikely that any light will come from the front, but if it is a concern this particular tent included a front that velcros on with a split in the middle for the camera. On the Harbor Frieght tent you will see in their photo that the front is a small circular opening which also cuts the forward light. In one small easy to set up space you have everything that you need to set up, take down, and set up again your product photo studio.
Now what about the background? Again, I recommend the flannel that I spoke about in Part 3 and in the same nuetral colors. The tent that I purchase also included backgrounds - velvet look panels in red, blue, and black. These each have velcro on the back at the corners and attach to velcro that came inside the tent. Because they have the velvet look they do collect dust particles that need to be removed before shooting your photos. A bit of velcro sewn on to fabric panels that you make easily allow you to attach the panel inside the tent. And the panels cover the back and the floor of the tent - taking care of the all that will be seen under and behind the item you are photographing. The Harbor Freight tent does not include panels but does include "hook and loop" fasteners (velcro) inside to hang your backdrops.
 Here is a view inside my tent. You can see the black panel that is included. On top of that I have draped light grey flannel over a small cardboard box. This was for the set up of photos of the lucet that I sell on Etsy. I lean the item on the fabric and against the side of the box so that it stands. I do not use a tripod as my camera has excellent image stabilization so I can handhold the camera while taking perfect macro photographs. I stand in front of the tent and shoot away. If you are going to use a tripod as I recommended in Part 1 then you would set that tripod up in front of the tent. We are going to talk more about tripods in a later article.
Simple, easy, and certainly portable - the light tent weighs next to nothing and folds flat to about a square foot or less.
Next we will talk about what to do with the images once they are in the camera.
To be continued...
Monday, April 20, 2009
Basic Product Photography - Part 1
For those selling on-line or in catalogs good photos of your items is essential. When you sell in person your customers can look at the actual piece, hold it, and see its beauty and value. When you must convey that with a picture you want to be sure that picture is perfect. This is just a basic guide to creating photographs that will best represent your work.
The first thing required is a good camera. There are many levels of digital cameras on the market. You can certainly do everything that you need to do to take product photos for your purposes with a point and shoot camera - one that has auto focus and auto exposure (which are basic to most). You do not need the best camera available but you do want a camera that has certain features that are required for good product photography.
The first feature that is a must have is Macro mode. A macro is a close up photograph. A camera lens has a set range of distance at which it will take clear images. This range determines how close you can get to the subject to take a focused image. Generally the shortest distance most lenses on point and shoot cameras will focus on is about three feet. While this may seem close it is really not close enough for product photography where the aim is to get close detail of the product. For this you need to be able to focus as close as six inches or closer and that is what the Macro mode setting on a camera will do. What is important to understand about macro mode is that this has a set range of distance also - and that range will change at different changes between the wide angle and telephoto range of your lens. So, if you set to macro and you are set to full wide angle you are set to the closest distance that you can get an image in focus. This range will always be specified in your camera's manual. If you move the telephoto control on your camera you will change that range and you will need to move the camera further away from the object in order to get a focused photo. Again, these ranges are stated in your camera manual. Some cameras add a Super Macro mode along with Macro mode. The Super Macro mode will allow you to get as close as a fraction of an inch to your image. This will make a remarkable image but generally this is way to close for a product photo. Remember, you want detail but you don't want your work examined as if under a microscope.
A second feature to look for on a camera is the ability to change the white balance on the camera. Most cameras come with auto-white balance, but there are situations where the auto setting will not do what you need it to do. White balance is the adjustment of the photograph to the light that it is taken in. Incandescent lights give off a yellow glow and when an object is photographed under regular room lights the image tends to look yellow. Auto-white balance should correct this but it does not always do so. Many cameras - but not all - will allow you to set the camera to the light you are shooting in. The type of light is indicated by little pictures - a light bulb for standard incandescent light bulb light, a bar with little rays coming from it for fluorescent lighting (which tends to give off a blue tint), a sun for sunlight, etc. When shooting under room lights you will want to set your camera manually to the incandescent setting to get a balanced, non-tinted image.
A third very valuable feature to look for on a camera is a good optical image stabilization system. This is a system built into the camera that will compensate for any movement of the lens when a photo is taken. This is especially important when macro shooting because when shooting that close even the movement of the camera button will blur the image. Canon Powershot cameras excel in Optical Image Stabilization. Other cameras offer this feature as well, but many rave over the results from the Canon cameras. This has been my experience as well. If you have a camera without this feature then a must have is the next thing to get for product photography.
The second thing required (unless you have a good optical image stabilized camera) is a tripod. As stated above, when shooting in macro mode the slightest breath of movement will result in a blurred image. A tripod will hold your camera solid and steady. It also has the advantage that it sets a fixed distance between the camera and the object that you are photographing. You want a decently made tripod that will hold your camera steady. They attach easily with a screw knob to a screw hole that is on the bottom of most cameras, put there for just this purpose. A floor standing tripod is best, but you will see small tripods and similar gadgets that will hold your camera on the table you are shooting on. These can be just as good, but they are not as steady as a good floor tripod.
To be continued...
Saturday, May 26, 2007
FREE Trial Ad Space
For a limited time and as a limited offer there is free trial ad space at The Art of Craft marketplace website for craft artists with quality work. Contact us via the link on that site!
Thursday, May 24, 2007
New Art Marketplace Website Launched
We are launching a new craft and art marketplace for craft/art web sites and on-line craft sellers. The site is called THE ART OF CRAFT just like this site. It is located at url, http://www.artofcraft.net.
This site is just getting started and in the process of offering free trial ads right now to those with Etsy shops and soon invitations will go out to other quality craft artists on the Internet. With these free one month trials we are hoping to build the site's traffic and establish the site as the first stop when looking for fine crafts and unique gifts.
Once established the marketplace will offer promotion and advertising to screened craft artists at very reasonable monthly rates. Keep checking back often at the site to see how it develops and to shop at the exciting artists that you will find there.
Those interested in advertising may contact us via the new site.
Subscribe to:
Posts (Atom)