A light tent is an enclosed cube with translucent walls that allow light to pass through on four to five sides. Many web sites have instructions to make one and what can be made will work - but rarely are you making something that will be easy to store and that folds conveniently away. I have found an inexpensive light tent that is just like the more expensive tents sold in camera stores. I wish that I had found this before I purchased mine which I bought in a camera shop for about $75.00. This one is half the price. I is found at a company called Harbor Freight. Harbor Freight is a tool retail company that sells imported tools as well as gadgets. They have a web site, a print catalog, and retail stores around the US. I first saw the light tent in person at one of their stores. Here is a link to the tent on their web site. They call it a photo tent (same thing) and it sells for $28.99. This is a great price and makes going through the time and effort of collecting the parts and making one not worth the effort. I have no stock in Harbor Freight and I get no commissions. I just think that this is an ideal way to get an essential part of a home product studio for very little money.
As I said, I do not have this inexpensive light tent. I paid twice the a
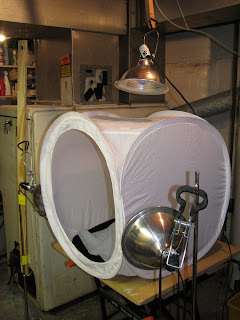
 mount for the same thing. Here is a photo of my home product photo studio. My studio is set up in my basement. And this part of the basement is a small room that also contains the furnace, the heating oil tank, and the washer/dryer. You can see how nicely this fits into a limited space and the best part is it all can be folded up and put away. Commercial light tents like mine and the one that is sold by Harbor Freight fold flat. Now, there is a trick to folding them that takes a bit of practice, but once you get it and realize that the frame is flexible enough to twist as it is needed to be twisted to automatically fold down, it becomes easy. The tent is sitting on a square board that is just the size of the tent and that board sits on a folding "Workmate" work table made by Black and Decker. The Workmate is there in the basement to use to work on projects so it was an ideal choice spot for my studio set up. It could just as easily be a folding card table. In the photo you can see the light arrangement that I use and you now can see the lights that I spoke about in Part 3 - around $6 each at Home Depot stores, Walmart, etc. I like the third light above to add extra light and knock away any shadows that I can't get rid of with the two side lights. The advantage of a basement is that you can put a nail in beam above and do no harm so the top light hangs down from a strip of wood with a hole drilled into it at the top and the lamp clips at the bottom. The two side lights are clipped to old folding music stands. This makes them easy to move and direct to where I want the light inside the tent. As you can see the lights are outside the tent and shine through the walls. This diffuses the light. The lamps are pointed to give the best light on the object being photographed. With this set up there is no need for a flash. You cannot see in the photo that in front of the tent and table is an overhead flourescent shop light. I will often put this light out so that it casts no shadows inside the tent. I have also kept that light on and compensated for it with the tent lights. You are standing in front of the opening so it is unlikely that any light will come from the front, but if it is a concern this particular tent included a front that velcros on with a split in the middle for the camera. On the Harbor Frieght tent you will see in their photo that the front is a small circular opening which also cuts the forward light. In one small easy to set up space you have everything that you need to set up, take down, and set up again your product photo studio.
Now what about the background? Again, I recommend the flannel that I spoke about in Part 3 and in the same nuetral colors. The tent that I purchase also included backgrounds - velvet look panels in red, blue, and black. These each have velcro on the back at the corners and attach to velcro that came inside the tent. Because they have the velvet look they do collect dust particles that need to be removed before shooting your photos. A bit of velcro sewn on to fabric panels that you make easily allow you to attach the panel inside the tent. And the panels cover the back and the floor of the tent - taking care of the all that will be seen under and behind the item you are photographing. The Harbor Freight tent does not include panels but does include "hook and loop" fasteners (velcro) inside to hang your backdrops.
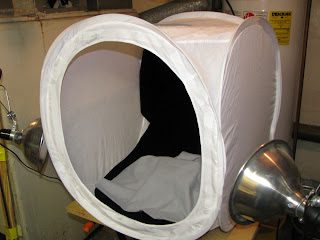
 Here is a view inside my tent. You can see the black panel that is included. On top of that I have draped light grey flannel over a small cardboard box. This was for the set up of photos of the lucet that I sell on Etsy. I lean the item on the fabric and against the side of the box so that it stands. I do not use a tripod as my camera has excellent image stabilization so I can handhold the camera while taking perfect macro photographs. I stand in front of the tent and shoot away. If you are going to use a tripod as I recommended in Part 1 then you would set that tripod up in front of the tent. We are going to talk more about tripods in a later article.
Simple, easy, and certainly portable - the light tent weighs next to nothing and folds flat to about a square foot or less.
Next we will talk about what to do with the images once they are in the camera.
To be continued...


3 comments:
Interesting idea..I'm gonna try it..
That is a GREAT idea! I would have never thought of it! Thank you so much!
A recent search of the Harbor Freight website showed the light tent as unavailable.
All photography stores sell light tents and they cost about $80 or less.
Post a Comment